How to stop a Leak on your Toronto Roof
A common problem is the roof leaks. This is caused by cracking in the caulking compound used during manufacture in the rain gutters and the sealant used to join all the different pieces of aluminium together which form the roof. The sealant tends to wear out over time crack and allow water to filter in through the cracks back along these channels into the side channel and then when you brake at a light for instance all the water will run down and get on to your feet which is really annoying especially in winter.
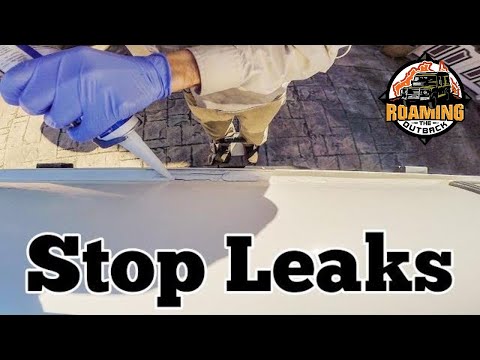
Over the last 11 years I’ve tried many times to seal the roof with some success. In the past I’ve used silicon which is generally not advisable because of the acetic acid curing which can damage paintwork and cause rust. But this time I’m trying Sikaflex 291 marine adhesive sealant. So hopefully this will be the winner. Now I washed the roof twice yesterday as well as using some cut and polish along the seams just to remove any flaking paint and grime. And then followed up with some methylated spirits to degrease the area to prep it ready for the Sikaflex. I also have some sandpaper which I’m going to do a light sanding in along the rain gutters just to tidy it up. Now this is a fairly messy job from past experience so you’ll need some gloves and some mineral turpentine and some rags to help clean up any excess. I tend to use fingers to get it in to the rain gutters as there’s not many tools that will fit the particular curvature of the gutter. So let’s have a go with some Sikaflex at sealing up these Defender roof leaks. There are 3 seams on the Toronto roof to complete.
First I run a rough bead along working the Sikaflex deep in to the gaps that’s then followed up with a rag soaked with mineral turpentine. Next I run masking tape around the outside of the gutters and then begin working the Sikaflex deep in to all the cracks. I do it in small 30 cm sections as the Sikaflex tends to tack off fairly quickly. I then add extra Sikaflex back and forth just to layer it up and then run my finger straight down that helps smooth everything out nicely. It’s important to clean it up as you go just so it doesn’t harden off. Also remove the masking tape before it begins to tack off just so you’re not damaging or ripping up the Sikaflex as you go. On the rear there’s the seam as well that’s much the same process. Just do it in sections and clean up as you go.
I also chose to fill in the pop rivets just in case water was getting in through there as well. The compound from the A pillars was cracking so I dug that out and refilled. Ok two weeks later and I’ve allowed the Sikaflex to cure off that takes around a week to get a full cure. In that time I had a few rain showers come through and I had no leaks come inside so it appears to be a success. One thing I noticed about the Sikaflex is it does tend to attract dust so the channels are kind of dusty dirty looking but to me that’s not really an issue as it’s up inside and you don’t see it. I did a light sanding in a few places just to smooth it out a bit better but I see no point in breaking the skin and disturbing it much it’s quite nice looking.
How to stop a Leak on your Toronto Roof was originally published on Toronto Roofing Company-Roof Repair Toronto-(647)-847-8826
from WordPress http://ift.tt/2BUv4Z2
via IFTTT
More info at www.toronto-roofer.com
Thanks a lot for sharing. Roof contractor west palm beach Will check back later for more of your articles.
ReplyDeleteReally a informative article, the suggestions you are provided here are great, thanks for posting about Toronto roofing
ReplyDeleteThis blog is very informative, and the suggestions provided about Toronto roofing are excellent. Thank you for sharing
ReplyDeleteLove that you mentioned regular inspections. At Gauntlet Roofing, we recommend annual checkups to catch small problems before they grow.
ReplyDelete